Thermistor - HVAC - RH (Remove and Replace)
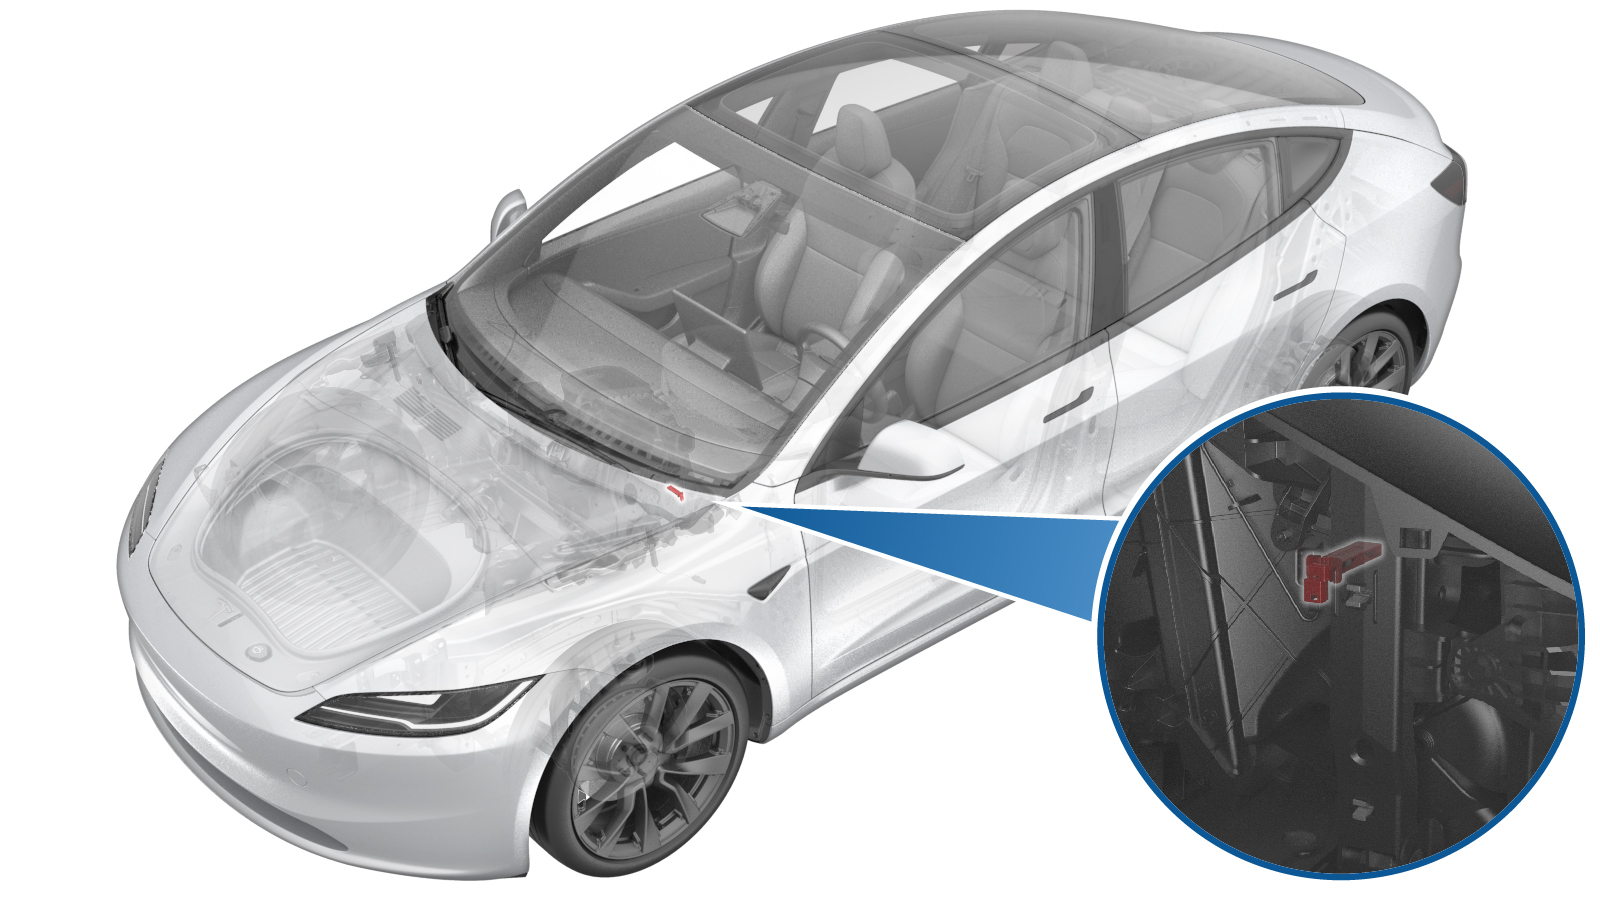 Correction code
1810130002
1810130001
FRT
2.58
NOTE: Unless
otherwise explicitly stated in the procedure, the correction code and its
associated FRT reflect all of the work required to perform this procedure,
including the linked procedures. Do not stack correction
codes unless explicitly told to do so.
NOTE: See Flat Rate Times to
learn more about FRTs and how they are created.
NOTE: See Personal Protection to make
sure you are wearing proper PPE when performing the procedure below.
NOTE: See Ergonomic Precautions for safe and healthy
working practices.
- 2026-11-12: Released new procedure.
Torque Specifications
| Description | Torque Value | Recommended Tools | Reuse/Replace | Notes |
|---|---|---|---|---|
| Bolts (x2) that attach the steering column to the body |
 25 Nm (18.4 lbs-ft) |
|
Reuse | |
| Nuts (x4) that attach the steering column to the cross car beam |
15 Nm (11.1 lbs-ft) |
|
Reuse | |
| Bolts (x2) that attach the LH portion of the cross car beam to the body |
29 Nm (21.4 lbs-ft) |
|
Reuse | |
| Bolts (x2) that attach the RH portion of the cross car beam to the body |
29 Nm (21.4 lbs-ft) |
|
Reuse | |
| Bolt that attaches the cross car beam to the HVAC assembly |
5.5 Nm (4.1 lbs-ft) |
|
Reuse | |
| Bolt that attaches the cross car beam to the upper side of the cowl |
25 Nm (18.4 lbs-ft) |
|
Reuse | |
| Bolts (x4) that attach the cross car beam to the HVAC assembly |
5.5 Nm (4.1 lbs-ft) |
|
Reuse |
Remove
- Open the front doors and lower the front windows.
- Move the front seats forward.
- Remove the center console end panel. See Panel - Rear End - Center Console (Remove and Replace).
- Move the front seats backward.
- Remove the rear underhood apron. See Underhood Apron - Rear (Remove and Replace).
- Remove the cabin intake duct. See Assembly - Fresh Air Gutter - HVAC (Remove and Replace).
- Remove the LH and RH wiper arms and blades. See Wiper Arm - Driver Side (Remove and Replace).
- Remove the LH and RH shock tower covers. See Cover - Shock Tower - LH (Remove and Install).
- Remove the cowl screen panel. See Panel - Cowl Screen (Remove and Replace).
-
Remove bolts (x2) that attach the
steering column to the body.
NoteUse of the following tool(s) is recommended:
- Cordless Ratchet/Impact Driver
- 13 mm socket
- 3 in extension
- Ratchet/torque wrench
- Flex head ratchet/flex head torque wrench
- Disconnect the LV power. See LV Power (Disconnect and Connect) (Modify).
- Remove the LH and RH upper A-pillar trims. See Trim - A-Pillar - Upper - LH (Remove and Replace).
- Remove the LH and RH lower A-pillar trims. See Trim - A-Pillar - Lower - LH (Remove and Replace).
- Remove the LH and RH footwell ducts. See Duct - Footwell - LH (Remove and Replace) and Duct - Footwell - RH (Remove and Replace).
- Remove the LH and RH center console side panels. See Carpet - Side - Center Console - LH (Remove and Replace) and Carpet - Side - Center Console - RH (Remove and Replace).
- Remove the center console assembly from the vehicle. See Center Console (Remove and Replace).
- Remove the lower instrument panel. See Assembly - Instrument Panel - Lower (Remove and Replace).
- Remove the steering wheel. See Steering Wheel (Remove and Replace).
- Remove the steering column control module. See Module - Steering Column Control (Remove and Replace).
- Remove the touchscreen. See Touchscreen - Front (Remove and Replace).
- Remove the instrument panel speaker grille. See Speaker Grille - Instrument Panel (Remove and Replace).
- Remove the LH and RH dash speakers. See Speaker - Dash - LH (Remove and Replace).
- Remove the center dash speaker. See Speaker - Dash - Center (Remove and Replace).
- Remove the instrument panel upper assembly from the vehicle. See IP Carrier (Remove and Install).
- Remove the LH air wave duct. See Duct - Air Wave - LH (Remove and Replace).
-
Disconnect the IP electrical harness
connector from the steering column.
-
Release the clips (x2) that attach the
headliner electrical harness to the LH lower A-pillar trim.
-
Disconnect the HVAC connector from the
LH body controller.
-
Disconnect the instrument panel
harness X035 connector from the LH body controller.
NoteRelease the lock and then remove the connector.
-
Release the blower motor harness clips
(x2) from the cross car beam.
-
Disconnect the blower motor
connector.
-
Release the instrument panel harness
clips (x4) from the body.
-
Release the locking tab and then pivot
the lever to disconnect the instrument panel harness connector from RCM.
-
Disconnect the J10 instrument panel
electrical connector from the RH body controller module.
-
Disconnect the J11 HVAC electrical
connector from the RH body controller module.
-
Disconnect three connectors on the car
computer.
-
Release the HVAC harness from the
instrument panel harness slots.
-
Release the clips (x2) that attach the
headliner electrical harness to the RH lower A-pillar trim.
-
Remove the clips (x2) that attach the
LH front main carpet to the footwell area.
-
Remove the clip that attaches the RH
front main carpet to the footwell area.
-
Remove the nuts (x4) that attach the
steering column to the cross car beam.
TipUse of the following tool(s) is recommended:
- Cordless Ratchet/Impact Driver
- 13 mm socket
- 3 in extension
- Ratchet/torque wrench
- Flex head ratchet/flex head torque wrench
- Lower the steering column and set it aside.
- Remove the LH and RH cross beam bar brackets. See Riser Bracket - Instrument Panel - RH (Remove and Replace).
-
Remove the bolts (x2) that attach the
LH corners of the cross car beam to the body.
TipUse of the following tool(s) is recommended:
- Cordless Ratchet/Impact Driver
- 15 mm socket
- 3 in extension
- Ratchet/torque wrench
-
Remove the bolts (x2) that attach the
RH corners of the cross car beam to the body.
TipUse of the following tool(s) is recommended:
- Cordless Ratchet/Impact Driver
- 15 mm socket
- 3 in extension
- Ratchet/torque wrench
-
Remove the bolt that attaches the
cross car beam to the HVAC assembly.
TipUse of the following tool(s) is recommended:
- 10 mm socket
- Ratchet/torque wrench
-
Loosen the bolt that attaches the
cross car beam to the upper side of the cowl.
TipUse of the following tool(s) is recommended:
- 13mm 12-point combination wrench
- Flex head ratchet/flex head torque wrench
- Ratchet/torque wrench
- 13 mm socket
-
Remove the bolts (x4) that attach the
cross car beam to the HVAC assembly.
TipUse of the following tool(s) is recommended:
- Cordless Ratchet/Impact Driver
- 10 mm socket
- 3 in extension
- Ratchet/torque wrench
-
Remove the cross car beam and wiring
harness assembly from the vehicle.
NoteRecommend assistance.CAUTIONBe careful not to damage the interior.
-
Disconnect the RH lower duct
thermistor connector.
-
Release the tabs (x2) and remove the
RH lower duct thermistor from the HVAC assembly.
Install
-
Install the RH lower duct thermistor
to the HVAC assembly.
-
Connect the RH lower duct thermistor
connector.
-
Position the cross car beam and wiring
harness assembly back to the vehicle.
NoteRecommend assistance.CAUTIONBe careful not to damage the interior.
-
Install the bolts (x2) that attach the
LH corners of the cross car beam to the body.29 Nm (21.4 lbs-ft)TipUse of the following tool(s) is recommended:
- Cordless Ratchet/Impact Driver
- 15 mm socket
- 3 in extension
- Ratchet/torque wrench
-
Install the bolts (x2) that attach the
RH corners of the cross car beam to the body.29 Nm (21.4 lbs-ft)TipUse of the following tool(s) is recommended:
- Cordless Ratchet/Impact Driver
- 15 mm socket
- 3 in extension
- Ratchet/torque wrench
-
Install the bolts (x2) that attach the
steering column to the body.25 Nm (18.4 lbs-ft)NoteUse of the following tool(s) is recommended:
- 13 mm socket
- Cordless Ratchet/Impact Driver
-
Install the bolt that attaches the
cross car beam to the upper side of the cowl.25 Nm (18.4 lbs-ft)TipUse of the following tool(s) is recommended:
- 13mm 12-point combination wrench
- Flex head ratchet/flex head torque wrench
- Ratchet/torque wrench
- 13 mm socket
-
Install the bolt that attaches the
cross car beam to the HVAC assembly.5.5 Nm (4.1 lbs-ft)TipUse of the following tool(s) is recommended:
- 10 mm socket
- Ratchet/torque wrench
-
Install the bolts (x4) that attach the
cross car beam to the HVAC assembly.5.5 Nm (4.1 lbs-ft)TipUse of the following tool(s) is recommended:
- Cordless Ratchet/Impact Driver
- 10 mm socket
- 3 in extension
- Ratchet/torque wrench
- Install the LH and RH cross beam bar brackets. See Riser Bracket - Instrument Panel - RH (Remove and Replace).
- Position the steering column for installation.
-
Install the nuts (x4) that attach the
steering column to the cross car beam.15 Nm (11.1 lbs-ft)TipUse of the following tool(s) is recommended:
- Cordless Ratchet/Impact Driver
- 13 mm socket
- 3 in extension
- Ratchet/torque wrench
- Flex head ratchet/flex head torque wrench
-
Fasten the clips (x2) that attach the
LH front main carpet to the footwell area.
-
Fasten the clip that attaches the RH
front main carpet to the footwell area.
-
Fasten the clips (x2) that attach the
headliner electrical harness to the LH lower A-pillar trim.
-
Connect the HVAC connector to the LH
body controller.
-
Connect the instrument panel harness
X035 connector to the LH body controller.
-
Fasten the blower motor harness clips
(x2) from the cross car beam.
-
Connect the blower motor
connector.
-
Connect the IP electrical harness
connector to the steering column.
-
Fasten the instrument panel harness
clips (x4) from the body.
-
Connect the instrument panel harness
connector to RCM.
-
Fasten the clips (x2) that attach the
headliner electrical harness to the RH lower A-pillar trim.
-
Connect three connectors on the car
computer.
-
Secure the HVAC harness to the
instrument panel harness slots.
-
Connect the J11 HVAC electrical
connector to the RH body controller module.
-
Connect the J10 instrument panel
electrical connector to the RH body controller module.
- Install the LH air wave duct. See Duct - Air Wave - LH (Remove and Replace).
- Install the instrument panel upper assembly to the vehicle. See IP Carrier (Remove and Install).
- Install the center dash speaker. See Speaker - Dash - Center (Remove and Replace).
- Install the LH and RH dash speakers. See Speaker - Dash - LH (Remove and Replace).
- Install the instrument panel speaker grille. See Speaker Grille - Instrument Panel (Remove and Replace).
- Install the touchscreen. See Touchscreen - Front (Remove and Replace).
- Install the steering column control module. See Module - Steering Column Control (Remove and Replace).
- Install the steering wheel. See Steering Wheel (Remove and Replace).
- Install the lower instrument panel. See Assembly - Instrument Panel - Lower (Remove and Replace).
- Install the center console assembly from the vehicle. See Center Console (Remove and Replace).
- Install the LH and RH center console side panels. See Carpet - Side - Center Console - LH (Remove and Replace) and Carpet - Side - Center Console - RH (Remove and Replace).
- Install the LH and RH footwell ducts. See Duct - Footwell - LH (Remove and Replace) and Duct - Footwell - RH (Remove and Replace).
- Install the LH and RH lower A-pillar trims. See Trim - A-Pillar - Lower - LH (Remove and Replace).
- Install the LH and RH upper A-pillar trims. See Trim - A-Pillar - Upper - LH (Remove and Replace).
- Install the cowl screen panel. See Panel - Cowl Screen (Remove and Replace).
- Install the LH and RH shock tower covers. See Cover - Shock Tower - LH (Remove and Install).
- Install the LH and RH wiper arms and blades. See Wiper Arm - Driver Side (Remove and Replace).
- Connect the LV power. See LV Power (Disconnect and Connect) (Modify).
- Install the cabin intake duct. See Assembly - Fresh Air Gutter - HVAC (Remove and Replace).
- Install the rear underhood apron. See Underhood Apron - Rear (Remove and Replace).
- Install the center console end panel. See Panel - Rear End - Center Console (Remove and Replace).
- Raise all the windows and close all the doors.