2024-03-25
Module - Air Suspension - ECU (Continental) (RHD) (Remove & Replace)
Correction Code 31100202
Warning
If the 12V power
supply is disconnected, do not attempt to open any doors with door glass in
closed position. Failure to follow this instruction could result in door glass
shatter.
Note
Before
disconnecting the 12V power supply, ensure that the driver’s door window is
fully open. Failure to follow this instruction could result in vehicle
lockout.
Note
Vehicles built before 11 April 2016 are equipped with Electronic Air Suspension
(Continental), vehicles built on or after 11 April 2016 are equipped with Tesla Air Suspension.
Removal
- Open both front doors and lower the windows.
- Move the LH front seat to its rearmost position.
-
Release the clips (x4) that
attach the LH instrument panel side cover to the instrument panel, disconnect the
connector, and then remove the instrument panel side cover.
-
Release the clips (x2) that
attach the LH middle A-pillar trim to the vehicle, and then remove the middle
A-pillar trim.
-
Release the clips (x4) that
attach the LH lower A-pillar trim to the vehicle, and then remove the LH lower
A-pillar trim.
NoteThe number of clips securing the trim varies depending on vehicle production date. Replace any damaged or missing clips prior to reinstalling the sill trim.
-
Release the clips that attach the
front section of the LH center console wrapped trim to the center console.
NoteThe center coonsole wrapped trim is attached to the console with 10 clips. Only release the clips that attach the front section of the wrrapped trim to enable removal of the center console carpeted closeout extension.
-
Remove the clips (x6) that attach
the LH center console closeout panel to the center console, and then remove the
center console closeout panel.
NotePull the side panel back and slide the closeout panel down behind the side panel.
-
Release the clips (x6) that
attach the lower glove box trim, and then remove the lower glove box trim.
- Release the clips (x2) that secure the LH footwell cover to the dash.
- Disconnect the footwell lamp harness connector.
- Remove the footwell cover.
-
Carefully fold back the front section of the carpet at the LH footwell.
-
Remove bolts (x3) that attach the
LH footwell harness cover to the vehicle (torque 4 Nm), and then remove the
footwell harness cover.
- Disconnect 12V power. See Disconnect 12V Power .
-
Release the clips (x5) that attach the body harness to the the bulkhead and the
BCM bracket.
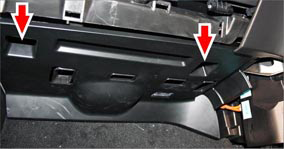
-
Remove the bolts (x3) that attach
the ECU bracket to the bulkhead (torque 8 Nm).
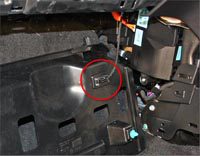
-
Disconnect the air suspension module connectors (x2), and the remove the module
from the vehicle.
Installation
Installation procedure is the reverse of removal, except for the following:
- After installation is complete, connect a laptop to the diagnostic port of the vehicle, and then use Toolbox 3 to locally connect to the vehicle.
- Unlock the vehicle gateway for diagnostic communication. See Gateway Unlock.
-
The following steps are only
required for vehicles that are equipped with Continental Electronic Air Suspension
(vehicles built before 11 April 2016).
- If the vehicle is built on or after April 11, 2016, go to step 6.
- If you don't have the vehicle's birth date, go to the next step.
-
Use Toolbox 3 to identify the
vehicle's air suspension type by reading the Gateway configuration parameter
value for cfg_airsuspension. See Gateway Configuration (Display and Change).
- If the value for cfg_airsuspension is "standard" or "plus", the vehicle is equipped with Continental Electronic Air Suspension. Go to the next step.
- If the value for cfg_airsuspension is other than "standard" or "plus", the vehicle is not equipped with Continental Electronic Air Suspension. Go to step 6.
-
Using Toolbox 3:
- Select the Actions tab and search for "Set Variant Code".
- Select the ODIN routine PROC_EAS_X_SET-VARIANT-CODEvia Toolbox:(link), and then click the link of the routine.
- Click RUN, and allow the routine to complete.
- Reinstall the latest vehicle firmware, or update the firmware if not the latest. See Firmware Reinstall - Touchscreen or Firmware Update.
- Perform the air suspension calibration procedure. See Ride Height - Adjust